I love reading year end reviews. Unfortunately, I haven't photographed most of what I sewed last year, so I won't be posting a Top 5 review. But I thought I'd post my Top 1 make of 2013. Here goes...
OCTOBER 2013
My son loves the new Sherlock Holmes on BBC. So much that, of only three things on his birthday wish list, the first was a coat like Sherlock's. It was nice to have something on his list that wasn't a video game.
First I looked for images of the real coat. It is no longer sold, but when it was, it cost £1350! The original had a fur collar. That was taken off, for the show, and red stitching added to the buttonholes.
 |
| The original coat in the Belstaff catalog |
 |
| As seen on the BBC series |
 |
| See the red buttonhole on the lapel? |
I committed to making the coat about two weeks before his birthday. So I scrambled to find supplies. The closest pattern I could find was Vogue 8720. Unfortunately, it was out of print. But I found a new pattern on eBay.
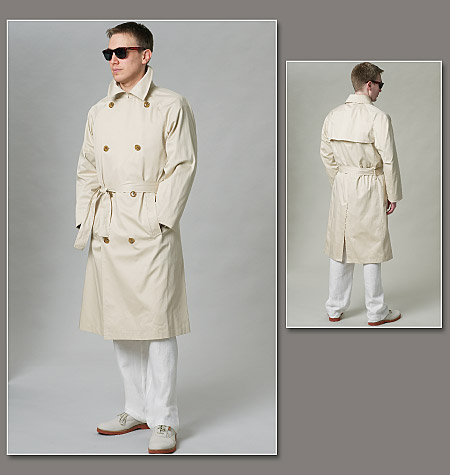 |
| Vogue 8720 (out of print) |
At the same time I searched for a black wool tweed fabric. I got lucky again, and found just what I wanted from fabric.com on sale for $7/yard! A week before his birthday both had arrived. The lining was from my stash.
 |
| This is how black the coat looks in real life. My photos are lightened to show detail. |
While waiting for the pattern and fabric, I figured out what size to make it. I had to do this without his help (=his body). I measured a couple of his favorite, close fitting T-shirts, to represent his actual shoulders, waist, and hips. Then I measured the sport coat he wore to Homecoming last year. I used this as a rough guide to let me know if the coat I was making was on track. I added ease to the sport coat measurements, since an overcoat will go over thicker layers.
The rest of my family and I all agreed that we wouldn't let him know the coat was home-sewn, for fear he wouldn't think it cool enough to wear. Maybe in about a year...Shhhh! Don't tell!
CONSTRUCTION
This coat was so much fun to make. After sewing knits almost exclusively for the past month, wool was so easy to manipulate in my sewing machine. And pressing...pressing was like sculpting! I enjoyed seeing the 2-dimensional fabric take on curves and be transformed to a 3-D coat. All in all, it came together smoothly.
I cut and sewed one part of the coat at a time. First up was the back. I cut the back in half horizontally at the waist, because I needed to make the top and bottom differently from one another. For the upper half, I made a midline vertical pleat. I made a triangle shaped tack at each end, a few inches below the collar and above the waist. For the bottom half, I made three pleats to make it look like the TV version.
 |
| Top back with vertical pleat; belt |
I drafted a lining, since the original pattern was unlined. For the back coat, I just copied the pattern pieces after I had made my adjustments. Not sure exactly how this would work with pleats, I attached the lining at the waist of both top and bottom halves, and pressed and pleated them as one piece, like interlining. I kept the sides and rest of the seams of the lining separate from the wool outer pieces, and later sewed them to the lining pieces of the sleeves and front. This resulted in the lining being just like any other coat lining except for its attachment at the back waist.
I added a short belt to the back, and it was on to the front. The only changes to the front were to raise the welt pockets from below to above the waist, and to add patch pockets with flaps below the waist.
 |
| left front |
 |
welt pocket
|
 |
| close up of welt pocket |
 |
| Patch pockets with flaps |
The welt pockets weren't as daunting as I expected, thanks to the drawings in the pattern instructions.
And my iron steamed out any little flaws! Gotta love that!
Other tweaks were to add cuffs
 |
| the cuffs |
...extend the collar width so it would look more mysterious when up, and respace the buttons. I didn't make the tie belt or back trench flap. I thought about making the buttonholes red, like the original, but was afraid that would make my son suspicious about it being made by Mom. I added a "Mossino" tag that I removed from a T-shirt of mine from Target and sewed it onto the coat lining so it looked store bought.
 |
| "Mossino" = "Mom's a liar" |
YOU KNOW HOW THEY SAY THE LAST 10% TAKES 90% OF YOUR TIME?
It all flowed together until the finishing touches. I had the day off of work for his birthday, and all that was left was buttonholes and the hand sewing- attaching the buttons, sewing the lining to the wool, and the hems.
I allowed twice the time I thought I needed. First the buttonholes. My machine made the first one horribly. Luckily I did it on a scrap, so I didn't have to rip it out. The second buttonhole was just as bad. On the third buttonhole the thread started fraying and breaking like crazy. Desperate, I broke out the owner's manual and actually read the buttonhole section. I tried rethreading the machine. I tried a different spool of thread. All fails. I thought about taking the machine into the shop, but was afraid it would take too long. So I threaded my old reliable 30 year old Riccar. At first that shredded the thread, too, but I finally found a spool it liked, and finished the buttonholes.
By then my allotted my time was gone, and I still had to make a birthday dinner and wrap the coat. Sewing is never fun when up against a deadline, and I started losing my patience. Of course, somehow fabric always picks up the bad vibe and gives it right back.
My son got home from school in the middle of wrapping the coat, but my daughter was on to it and distracted him from coming into the living room where I was struggling to get it in the box. Whew!
I think I was looking forward to the big reveal even more than my son was excited about opening his gifts! I was so hoping he would love it, that it would be what he hoped for, and that it would fit. After singing Happy Birthday, he opened the box, recognized it contained a Sherlock coat, goofily wrapped it around his head- and beamed! And so did I!
 |
| front |
 |
| back |
FINAL TWEAKS
My son wore his new coat the rest of the evening. Success! However, it was obvious it was too big. In retrospect, the original pattern is quite loose fitting, and uses the belt to pull the coat near the body. I probably compounded the ease allowed because I would rather have had it too big than too small.
But I dreaded taking it apart to take it in. Not only was it top stitched to heck, but I had no idea where to begin because of the curved and unusually placed side seams with darts. I wracked my brain, and procrastinated... I needed a new set of eyes to help figure out the puzzle of refitting the coat. I remembered meeting one of our neighbors at a recent party, and gave her a call. She used to make costumes at the Henry Ford museum, and now sews reproduction costumes in our town. She generously took a look and immediately pointed out the seams to undo. They were just the seams I dreaded ripping out. But somehow it felt better to have someone else tell me that. And it wasn't as bad as I feared. It took about an hour once I got down to it, and finally, my son had his coat. He wears it to school- the ultimate test of cool.
 |
| "Elementary!" |


